Introduction and Prerequisites
This go live checklist is for a multi-store Central Acme only.
Other sections deal with Satellite Acme and Single Store Acme.
If your Acme will be interfaced with your accounting system you should have already reviewed and performed tasks in AcmeFor{YourAccountingSystem}Setup.PDF
Global Settings
-On any one Acme computer
•Confirm information on ALL tabs in >Maintenance >Acme Setup Information screen. The information on these screens affects all users.
•Setup Data Pump. See F1 help within the Data Pump application for details.
•Confirm data for several customers and items. See ALL tabs of...
Acme Point of Sale >Maintenance >Customer
Acme Point of Sale >Maintenance >Inventory
•If you are authorizing any Tender Types setup Electronic Payments
•Set up Users and User Groups. >File >Administration >User Accounts.
Check User and Group privileges. Since you are integrated with a host accounting system consider disabling privileges that allow editing of customer and inventory data as most of that information should come from host accounting system. See AcmeForAccountingSystem}Setup.PDF for more information.
Users entered into Central Acme do not get pushed out to the stores.
•>Maintenance >POS Terminal Setup.
POS Terminal information does not flow from Central to Satellite Stores. Cash Tray Beginning Balance flows from stores back up to Central. If your Cash Tray Beginning Balance never varies then you can skip this step. If your beginning balance can vary from day to day or terminal to terminal than you should setup unique terminal codes in Central Acme for each terminal at each store.
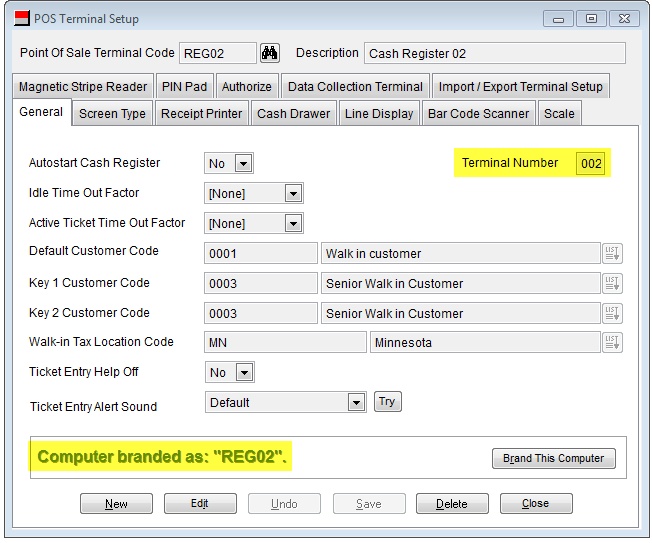
See Illustration 02 below.
•On the [General] Tab, make sure each terminal has a unique Brand. Use the tool bar next / previous buttons to scroll through all terminal records and insure that Default Customer Code, Key 1 Customer Code and Key 2 Customer Code are set appropriately for each terminal. If there are more terminal records than what you are using set the codes to blank for any unused terminals as well.
POS Terminal Setup
We will later backup Central Acme and restore it at each store. Adding the terminals here is just more convenient and it sets up cash tray records so you can maintain separate beginning balances at each store.
•Central Acme >Maintenance >POS Terminal Setup.
On the [General] Tab, make sure each terminal has a unique Brand and Terminal Number. The brand is shown at the bottom of the screen. See Illustration below.
•Repeat while at each terminal.
You don’t need to confirm setup of all POS Terminal tabs since hardware may vary at the stores.
Each computer that runs Ticket Entry must have a unique Brand and Terminal Number:

If you have multiple stores AND start days with a variable amount of cash in tray (beginning balance) then deploy using unique Terminal Codes per store. Build terminal records in Central Acme using existing records; add new records (in Central) as needed. Then backup Central and restore it at each store.
In this example we built Terminal Codes based on Store Number...
Store 001:


Store 002:
