Pax Five Connection Cable, aka "Cluster Cable".
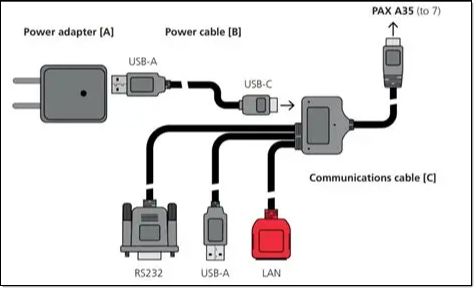
With Acme, the LAN connection is not used.
RS232 or (not both) USB-A connects to the computer. See below, you must ensure the device is configured accordingly.
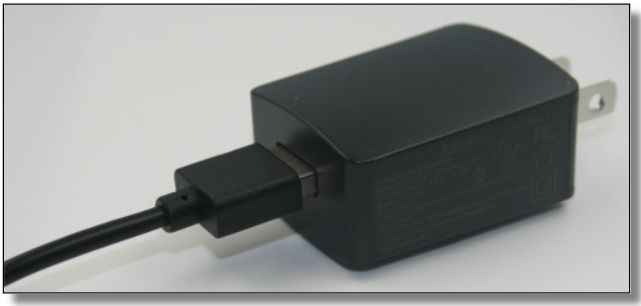
USB-A to USB-C cable plugs into Cluster cable junction and A/C power block.
Pax Three Connection Cable:
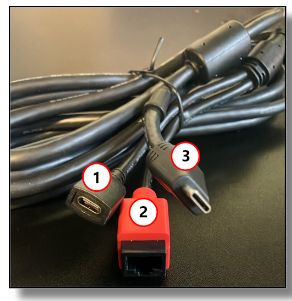
IMPORTANT: AC power block is not typically used. The USB code must be plugged into a BLUE "high output" USB port on the computer.
Above left, main cable assembly, yours may be slightly different but the connectors are essentially the same.
Default cableConnections Numbered...
1.AFTER installing the virtual com port software, plug USB cable into connection #1 shown above and into any BLUE USB port on computer
IMPORTANT: When you plug USB cable into port #1 shown above you should here a click and not be able to see metal between male and female. If you do not get the cable clicked in tight the PAX device can boot up to WELCOME, but Windows may not recognize the device. Also, try BLUE USB port first and if that does not work try BLACK (standard) USB port.
2.Network connection. This is not used.
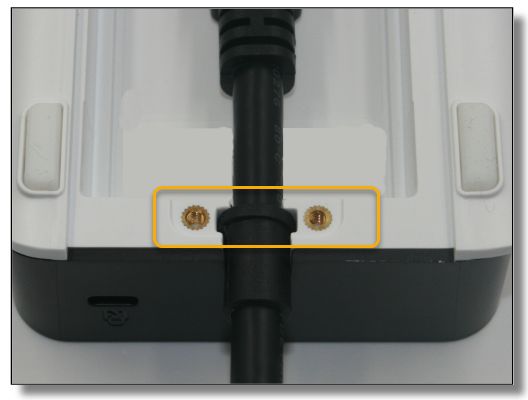
3.Device Connection. Plugs into the underside of the PAX A35, remove two screws and fit it under the panel. Make sure you slide the cord relief (shown below) into position.
4.Not shown (optional) Serial Connection. Has two screws that screw into serial (COM) port on the computer. These cables are rare, and likely discontinued. You will use either a serial or USB data cable to connect to the computer, never both.
There is no power on/off button. The device powers up when the USB cord is connected to computer (three connection cable) or A/C power block (five connection cable).
The device is ready for use when the screen displays "WELCOME".
To access the Android Desktop from the Welcome screen, swipe up from the bottom and tap the arrow twice. Use the password, "pax9876@@" to access both the Android Desktop and Settings.
Cord relief:
For more information setting up USB devices see Powered USB Ports
Serial Devices
Factory settings do not typically enable use of serial cable. For help please see Pax A35 on this page: How to change PIN Pad interface settings - Datacap Systems, Inc.
Note: if you select both serial and USB (virtual serial) type connections in device settings the device does an excellent job of switching back and forth when you change out data cables. Do not connect both data cables (USB and Serial) to the computer at the same time.
If using serial connection, the USB cord that is an integral part of the main cable IS NOT USED. The shorter USB power cord as described above is used for power.
After assembly the COM port needs to be entered in Acme POS Terminal setup, then do Pad Reset and Download Parameters.
Install Driver for PAX A35 (USB Devices Only)
Do not plug USB cable into the computer until after the drivers are installed. Follow these steps...
1.Log into computer as Windows Administrator. Download and install drivers and then reboot your computer.
2.After logging into Windows, power up the PAX unit using button on the right side of the device. Wait for WELCOME SCREEN, then plug the USB cable into the unit and your computer.
3.Within 60 seconds two new PORT devices should show up in device manager. Make a note of the COM number assigned to the port, if one includes the word "Daemon", select the other port number. In some cases you may not see Pax or Daemon in the device description and you will have to test each port in POS Terminal Setup.
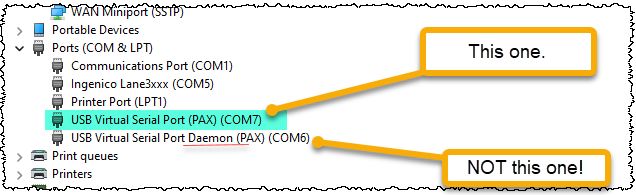
The COM Port number needs to be be entered into Acme POS Terminal Setup, then do Pad Reset and Download Parameters.