Click >Maintenance >Acme Setup Information >POS Pricing, Quantity, discount Options
System Decimal Settings
Pricing Decimal Places -Allow 2,3, or 4 places to the right of the decimal point.
Quantity Decimal Places -Allow 0,1,2,3, or 4 places to the right of the decimal point.
This controls display in many areas of Acme including Ticket Entry and on some invoices / receipts.
If set to 3 or 4, set ATM Numeric Entry (below) to OFF. This will make entry of manual prices easier in Ticket Entry.
Ticket / Tender Entry
ATM Numeric Entry -Choose from Off, Dollar Values Only, or Dollar Values and Quantities. When enabled the user need not enter decimal places during Ticket Entry.
If enabled for Dollar Values most stores would also set the Pricing Decimal Places above to 2.
If enabled for Dollar Values and Quantities most stores would set the Pricing Decimal Places to 2 and Quantity Decimal Places to 0.
Round Fractional Pennies to the Next Penny. Yes/No -Dictates how Acme rounds fractional pennies on extended prices when the fraction represents less than one-half penny. Fractional amounts equal to or greater than one-half penny are always rounded to the next penny.
Example, item is priced 1.231
Quantity |
Extended Price when Round Fractional setting = YES |
Extended Price when Round Fractional setting = NO |
Difference |
1 |
1.24 |
1.23 |
one penny |
2 |
2.47 |
2.46 |
one penny |
3 |
3.70 |
3.69 |
one penny |
4 |
4.93 |
4.92 |
one penny |
5 |
6.16 |
6.16 |
one penny |
5 or more |
... |
... |
no difference |
The biggest possible difference on a single line item is one penny because the rounding only done on extended prices, not each prices.
If you use a host accounting system this control allows you to configure Acme to match the rounding method used in your host so an invoice entered in Acme EXACTLY matches an invoice entered into your host.
Also see Pricing and Quantity Decimal place settings in Acme and your host, as they may also affect rounding.
Trade Discounts -Choose from Off, Apply to All Prices, Apply to List Price Only. A Trade Discount is a percent discount that assigned to a customer in Customer Maintenance.
"Apply to All Prices" means the Trade Discount will be deducted from List Price as well as prices derived from Price Codes including those for quantity breaks, specific customers and date driven special prices. (also see next field regarding Manual Prices)
Apply Trade & Ticket Disc. To Manual Price Yes/No -A Manual Price is a price that is entered by a clerk keying in the dollars and cents to sell or return an item for. A Trade Discount is a percent discount that assigned to a customer in Customer Maintenance.
Max Line Item Discount Percent -Level 1 thru Level 3 -Users can be assigned different Discount Level Privileges (1, 2 or 3). This control allows management to set up the maximum percent discount that will be allowed by any given user on a per line item basis. For example a Level One user could be limited to discounting any single line by up to 10%. A level 2 user could be limited to discounting any single line to 15% and perhaps a level 3 user could go to 18%.
A manger or user with higher discounting privilege can log in using Manager Key and trump the discount level.
Do not set users up with conflicting privileges. For example, a user that has Manual Pricing privilege is not influenced by this setting.
Limit Ticket Discount to Max Line Item Discount Yes/No -A Ticket Discount is one that comes off all eligible line items. For a line item to be eligible for discounts it must have Allow Discounts set Yes in Inventory Maintenance.
Prevent Entry of 0.00 Prices On Line Items Yes/No -Clerk will not be able to manually change a price to 0.00. Works with "Block $0 Price Items" described below.
Note, if user has "Store Manager" or "Administrator" privilege this setting has no effect, a confirm $0 price dialog will be presented.
Maximum Quantity Alarm -Alert clerk if quantity entered during ticket entry exceeds the number entered here. This is a safety feature that can help prevent errors like accidentally scanning a bar code number ticket entry when Acme is waiting for quantity.
Enable Unit of Measure Selection Yes/No -Allow use of the "Change UOM" function key in Ticket Entry.
If Yes then you should also activate "Display Selling UOM" on POS Terminal Setup >Screen Type Tab.
Display Factored Quantities and Pricing -Changes display during Ticket Entry. Does not change the receipt or the data stored in Acme transaction tables. Works with "Get Quantity Factors From" setting described directly below. Please read that section, as choices made there may dictate your choice here.
Get Quantity Factor From -Choose from UOM factor or PLU Selling Quantity.
If you have a Stand Alone Acme or use Acme with QuickBooks...
You can set it either way.
Set to "UOM Factor" if any item(s) are sold OR bought using more than one unit of measure. Note: You can set up any number of additional UOM’s and their PLU’s (price look-up codes) directly in Acme on the PLU tab.
If you have TurningPoint or Accpac 300...
If you NEVER edit Selling Quantity in Acme Item Maintenance and NEVER edit UOM factor in Acme Unit of Measure Maintenance use "From PLU Selling Quantity".
If you have Pro Series, VisionPoint or AccountMate...
Set to "From Unit of Measure Factor".
The following images show how this changes the display during Ticket Entry. All sell the same 25 pound bag of potatoes using same PLU. The potatoes are stocked by the pound and sold by the pound or in 25 pound bags.
The settings found in Example 1 and Example 2 are the most often used.
The settings found in Examples 3 and 4 are seldom used and cause issues if the clerk is not paying attention. They are less intuitive.
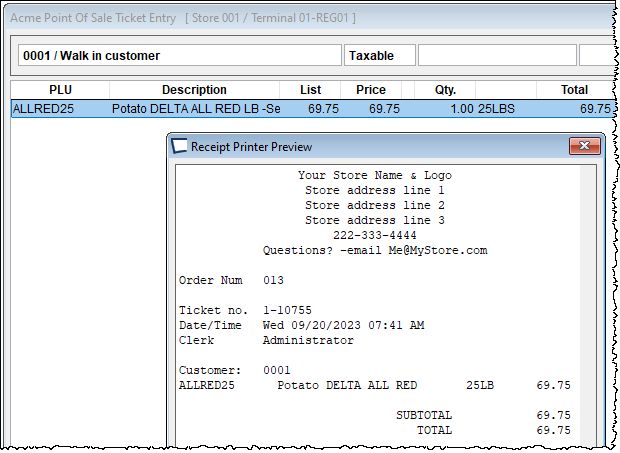
Example 1) Display Factored Quantities and Pricing is YES and Get Quantity PLU Factors From is set to UOM Factors...
In POS Terminal setup "Display Selling UOM" is Yes. In our Ticket Entry image below this adds the column that shows "25LBS".
The UOM assigned to the PLU should have a factor of 25 since in this example our stocking UOM is a single pound.
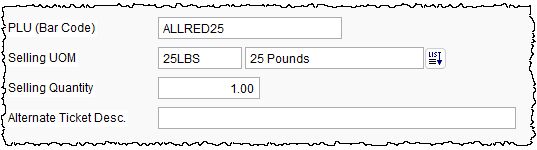
Ticket Entry and the receipt look like this:
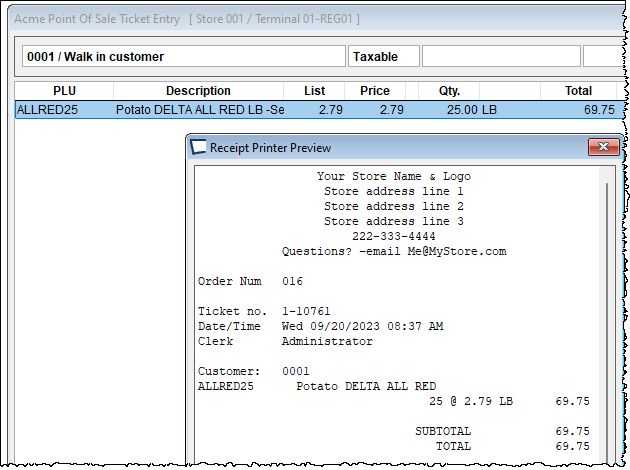
Example 2) Display Factored Quantities and Pricing is YES and Get Quantity PLU Factors From is set to PLU Selling Quantity...
In POS Terminal setup "Display Selling UOM" is Yes. In our Ticket Entry image below this adds the column that shows "25LBS".
Your item record should have the PLU set up with a SELLING QUANTITY (on the item record) of 25. The Selling UOM should include the weight (instead of just LBS) to be more intuitive.
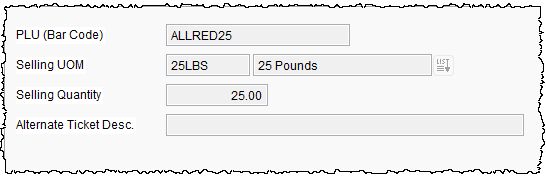
The info the clerk sees and the receipt look good:

Example 3) Display Factored Quantities and Pricing is NO and Get Quantity PLU Factors From is set to UOM Factors...
In POS Terminal setup "Display Selling UOM" is set to NO. This hides the UNITS column on the Ticket Entry Screen.
In the image below, receipt style 3 is used. If you do not want to show the UNIT column on the receipt, choose receipt style 1 or 2 instead.
These settings are not intuitive when the clerk changes quantities. For example, if they scanned PLU ALLRED25 they added 25 pounds to the ticket. If they change the QTY to 2, they did not add a second 25 pound bag to the ticket. To do that they would need to change the quantity to 50.

Example 4) Display Factored Quantities and Pricing is NO and Get Quantity PLU Factors From is set to PLU Selling Quantity...
Your item record should have the PLU set up with a SELLING QUANTITY (on the item record) of 25. The Selling UOM should NOT include the weight, it should just be LBS, to make use more intuitive.
These settings would not be easy to use when the clerk changes quantities, best practice dictates that you use one of the previously discussed settings. The reason is simple, if they scanned PLU ALLRED25 they added 25 pounds to the ticket. If they change the QTY to 2, they did not add a second 25 pound bag to the ticket. To do that they would need to change the quantity to 50.
Insufficient Quantity Alert Choose from the following:
Disabled – this is the default. It allows any item to be sold beyond on hand quantity.
Alert Only – the clerk is alerted but the item is accepted anyway. This is the same as default but with a beep message.
Confirm Sale – the clerk is alerted that there isn’t sufficient on hand quantity and the clerk must confirm the sale. The default is ‘no”.
Inhibit Sale – the clerk is alerted that there isn’t sufficient on hand quantity and the sale of the item is blocked.
There is a privilege called “Allow Item Oversell” available to override "Inhibit Sale" making it work like "Confirm Sale" for individual users or groups. In an environment where over sells are absolutely not allowed make sure no user or group has this privilege.
The test for sufficient quantity is performed when you add an item to a ticket or use change quantity action key. Kit items are not tested via this method. Decisions are made in the Expanded Kit dialog.
When a customer asks about quantity the clerk can view the on-hand count on the Item List or Expanded Kit screen. With use of this setting, the clerk will also be made aware if they try to sell more than then Acme thinks you have on hand.
Block $0 Priced Items -Useful in environments where customer specific pricing is prevalent, you have items where List Price is 0, but the item is not Give Away.
When a zero priced item is encountered during ticket entry, the clerk is alerted with a message and the item is not added to the ticket:

Has no affect if List Price is 0 and the customer price is not, in that case the customer price will be used. For the block to occur Item Control in Inventory Maintenance must be set to Default.
Works with USER level privilege "Allow Sell $0 Item" set up in >File >Administration >Edit User Accounts. Members of the Administrators group are not subject to this privilege.
Works with "Prevent Entry of $0.00 Prices On Line Items" described above.
For more information see: Ability to Sell $0 Items
Ignore List Price During Ticket Entry Y/N?
The main use is in multi-store deployments where each store has different prices. There is also an item level setting for this. If the global setting is activated, then the item version control is disabled and will show as always checked.