Click >Inventory >Physical Inventory
If this menu choice is not active click >Maintenance >Acme Setup information >Store information tab and activate purchasing (yes purchasing).
Use Portable Data Collection Terminals or the Acme Mobile App to count on hand inventory.
Before you start counting with the Portable Data Collection Terminal (DCT) you should ensure the clock on the DCT is synchronized with your computer clock. The easiest way to do this is to go into POS Terminal Setup and either send the application to the DCT or start the application on the DCT, while connected to the computer. Either action syncs the clocks. (this is not necessary with the Acme Mobile App)
|
If your file comes from the Acme Mobile App or Portable Data Collections Terminal it contains time stamps. the counts you gather do not replace the on hand quantities in Acme, they are used to calculate adjustments. If your file does not include time stamps, existing transactions are not considered when the adjustments are calculated, if the store is open upload and post adjustments frequently.
Time stamped adjustments are more accurate because they represent the difference between what was expected and what was actually counted. They also factor in sales and returns that occurred during the time between the count and the time the data is imported from the Data Collection Terminal into Acme. See Physical Inventory Tutorial

IMPORTANT NOTE: You can scan (or type in) any Acme Item Number or PLU (regardless of it's unit of measure) but ALL quantities must be entered as stocking unit of measure. -Example: You have 1 an 1/2 cases of 12. You could scan the bar code on one case, but do not enter quantity of 1.5, instead enter quantity of 18.
You can import multiple batches before posting adjustments but should avoid having the same item in more than one batch. -If you have items in more than one area of the store you need to count them in one batch. When an item is in more than one batch you must hand edit the data. See Item in Prior Batch below.
Import Counts from CSV file -does not delete the CSV file after import. If you import it again into same batch you will be notified that the items already exist. they will not be imported again. To prevent old files from being imported into future batches you may wish to move them to a backup folder after import.
File Level Column -On hand number from Inventory Maintenance at the time you imported inventory counts from data collection terminal.
Adjustment Column -When you use the Data Collection Terminal to gather on hand quantities your work is time-stamped. Sales, returns an PO Receipts that occur after you capture a count in the terminal are used to calculate an adjustment.
(current on hand) – (total quantity sold after count date & time) = Inventory level at time of count
(counted quantity) – (inventory level at time of scan) = Adjustment
New Level Column -the new on hand level Acme will have after you Post Adjustments.
|
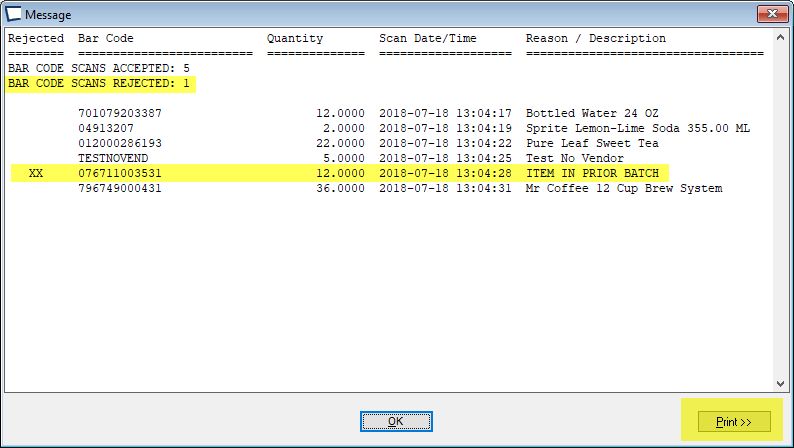
Item in Prior Batch
During import from Data Collection Terminal Acme looks to see if the item is already on the Physical Inventory screen. If it is, it was counted in a prior batch. The incoming data for that item will be rejected, it will not be added to the batch of data already displayed on the computer screen.
The rejection will be noted in an on screen message, along with the pertinent details. Print the message, then edit your data by replacing the old count or adding to it as desired.

