During the installation process you will be asked to plug the USB cable into the printer and the computer. Do not plug it in before you are asked.
Download the documentation (1) and installers (2) here:
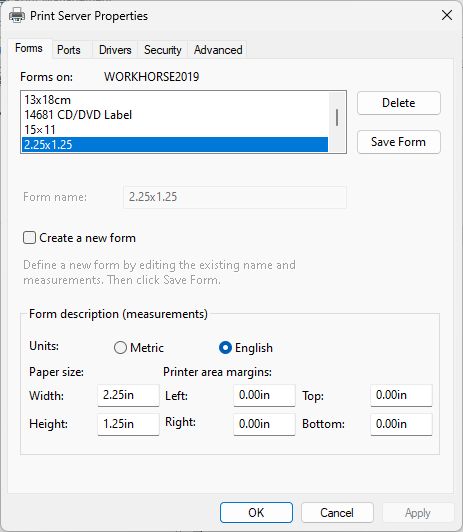
First, use Windows “Print Management” app to define a form that is 2.25x1.25. Name the form 2.25x1.25 (no spaces in the form name).
TIP: at command prompt or Open dialog type: printmanagement.msc <enter>
Install Windows USB Driver
For our purposes it does not matter if you install USB_BTP-L540 BPLE or BPLZ driver for Label Printer and USB port. There is no need to run Advanced setup.
If you allow Windows to manage your default printer, you will need to select the BTP-L540 printer during print jobs until Windows learns the association.
If you do NOT allow Windows to manage your default printer you should designate the BTP-L540 as your default printer, otherwise print from preview window will fail.
IN the printer driver, select the custom form size (defined above) in 3 places:
-Printer Properties > device settings (1)
-Printer Preferences > Options (2)
-Printer >Advanced Tab >Printing Defaults > Options (3)
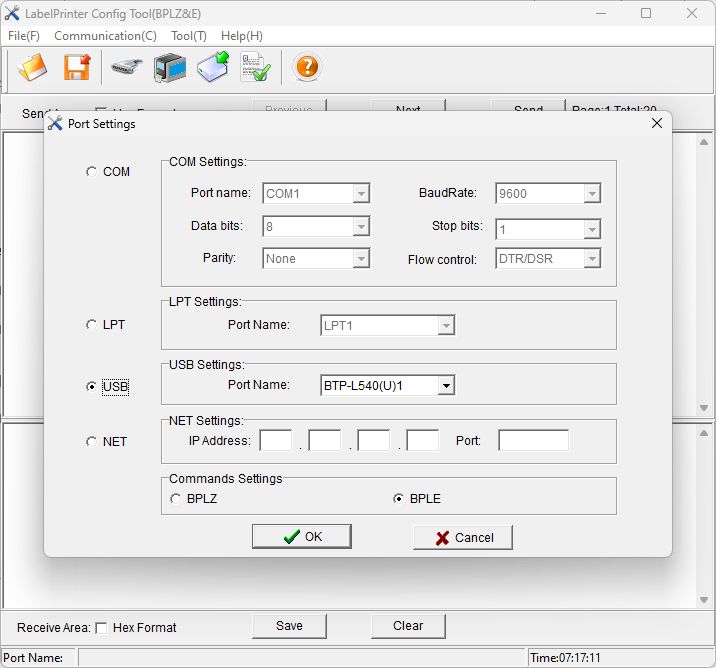
Install and use the Printer Config Tool
This is a .net program and there is no setup or installation process required. Simply unzip the package wherever you want to run the program.
Run "LabelPrinter Config Tool(BPLZ&E).exe" and tap >Communication > Port Settings. Select USB and your printer from the drop down list, then tap OK.
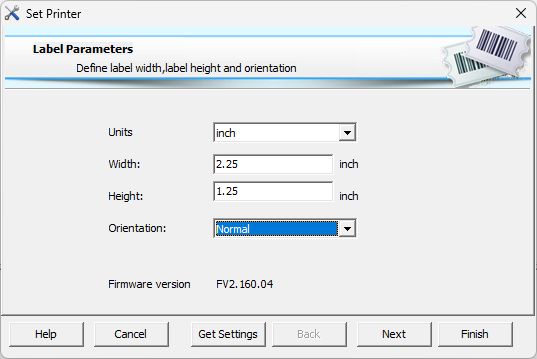
Tap >Tool >Set Printer
Tap the Get Settings button, and after Firmware version is populated fill in the screen as shown below, then tap NEXT twice
Note the GET SETTINGS button retrieves settings on a per page basis. It is only required to get settings on first page because the software needs to know what firmware is loaded in the printer.
You should be on the Media Screen shown below. Fill it in as shown and tap NEXT.

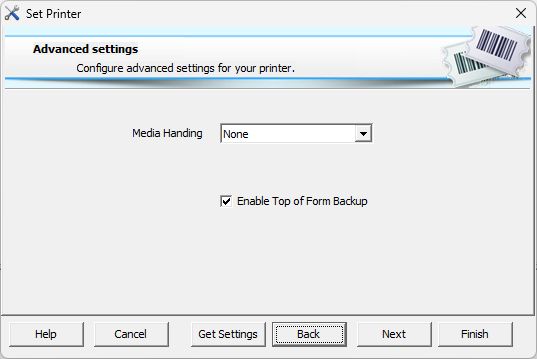
Ensure that Advanced Settings has the settings as shown below. Then tap NEXT.
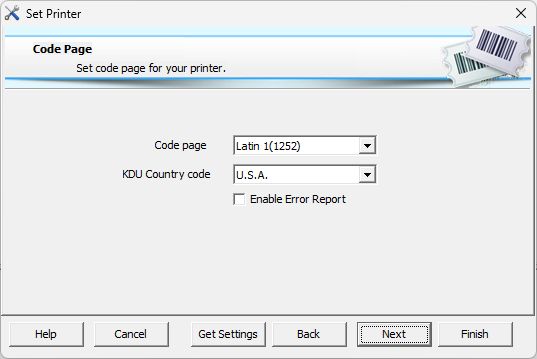
Set Code Page as shown, and NEXT
At this point you can tap the FINISH button to save the settings to the the printer.
Troubleshooting
Yellow light on printer and printer windows says "Label Peel".
There are probably labels hanging out of the printer, remove them.
The following changes are not usually necessary. Some of these are available and much easier to use do using the Printer Config Tool outlined above.
Reset printer to factory defaults:
1.Press the paper feed (PF) button until light blinks. Screen should read SETUP…
2.Press the paper feed (PF) button until light blinks.
3.Tap the PF button until you select FACTORY RESET.
4.Press the paper feed (PF) button until light blinks.
5.Tap the PF button to select YES.
6.Press the paper feed (PF) button until light blinks.
The screen will read INITIALIZING and reset will complete.
If your printer requires calibration:
1.Press the paper feed (PF) button until light blinks. Screen should read SETUP…
2.Tap the PF button until you select CALIBRATION.
3.Press the paper feed (PF) button until light blinks.
Calibration is complete.
=
Change PEELER to TEAR OFF
If your printer status window displays "PEELER" you need to reconfigure the printer for tear off mode.
Start with green light, tap Paper Feed (PF) button to get to green if need be. Then follow steps below.
1.Press the paper feed (PF) button until light blinks. Screen should read SETUP…
2.Press and hold the PF until light blinks. (this selects SETUP)
3.Tap PF button once, to select PRINT MODE.
4.Press and hold the PF until light blinks.
5.Tap the PF button several times to cycle through the choices. REWIND, TEAR OFF, PEEL OFF, CUTTER. Stop when you select TEAR OFF.
6.Press and hold the PF until light blinks.
7.Tap PF button 10 times. This should select SAVE ALL.
8.Press and hold the PF until light blinks. When you release your finger the printer will initialize with new settings. The window should no longer read PEELER.
9.Cycle the power on the printer, using switch in the front.
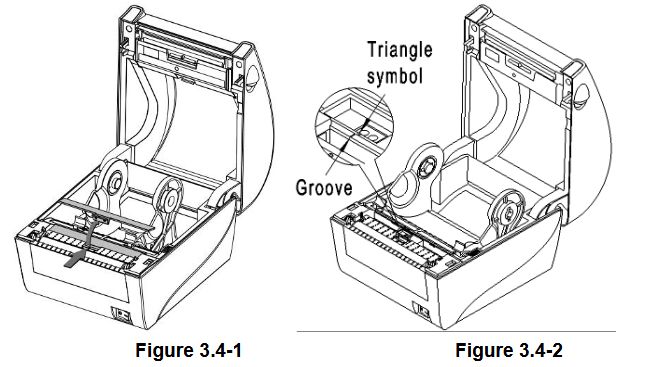
Use caution when loading rolls of labels. The two little black thumbs each have a finger below them. You want the paper below the thumb and above the finger.
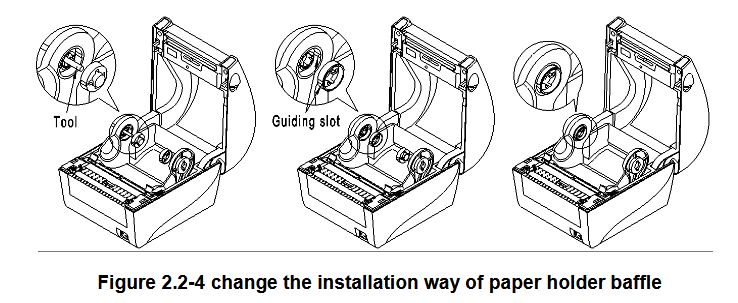
If your paper roll has a large diameter core you may need to use a screwdriver or other long tool to poke out the paper holder baffles and flip them around, as illustrated below:
=
Paper Sensor Adjustment
The paper sensor must be set in the middle of the paper roll bay, between right and left. There is a clip on the front edge of the clear plastic window that covers the sensor. Use the clip to remove the window and slide the sensor right or left. There is a groove and a triangle symbol marked on the pieces to denote the middles. For more information see the BTP-L540 User's Manual.