Click >Maintenance >POS Terminal Setup >General Tab
Terminal Code, Description and Terminal #
Best practice is to use code and description to describe the store and the location of the POS terminal when possible.
The number becomes the first digit(s) of your receipt number. It also is used for the terminal ID if you do electronic payment processing (credit cards etc) within Acme.
Important: To aid reconciliation and properly process integrated electronic payments you should always assign each terminal a unique terminal number. Because of the many ways Acme is deployed this is not enforced by Acme.
Screen Type
Type dictates:
•Size of Ticket Entry and Ticket Tendered Screen
•Visibility of Function Key Legends (keyboard template) on screen.
•Touch Screen or regular screen.
For illustration of each see Screen Types
You can set Screen Type on a per terminal basis so you can different layouts on different terminals.
For example if you have a cafe with a gift shop your could run a touch screen in the cafe and a more traditional layout in the gift shop.
For best results set your monitor resolution to the save value as the screen type you select.
Some of our maintenance dialogs are designed for 1024 x 768, so only set your computer to a lower resolution when it is dedicated to Ticket Entry.
If your computer will be solely used for Ticket Entry you may want to set Windows "text size" to 125%. Simply right click your computer desktop and then go into > Screen Resolution >Make Text and other items larger or smaller.
PLU Column Width (that will be displayed during Ticket Entry)
Choose from Default, 2x or Hide Item Description.
The default setting works well unless you have extraordinarily long PLU's.
Hide Item Description works best with this next control set to yes...
Display Extended Item Description
If yes, in Ticket Entry the highlighted item will have it's full description displayed at the bottom of the screen. This is helpful if some items have very long descriptions or if you have Hide Item Description selected above.
Display Selling UOM Y/N
Not displaying Unit of Measure on the Ticket Entry screen leaves more room for item descriptions.
If you use multiple units of measure on any items set this to YES as it also affects display of List Price.
(When YES List Price is multiplied by Quantity Factor)
Hide Mouse Pointer
Parks the mouse pointer just out of sight in the upper right hand corner of the monitor.
Disable System Menu
Disabled the Acme system menu during Ticket Entry. Windows functions like “alt-tab” and “ctrl-alt-del” are not affected.
Display Food Stamp Subtotal Y/N
Display sub-total of all Food Stamp eligible items on the Tendered screen.
Auto Start Cash Register Y/N
Allows you to setup Acme so that when you log into Acme the Ticket Entry Screen is automatically brought up. Only use this setting on a machine that is fully configured and will only be used as a register. To "un-auto start" your machine you need to delete the acmepos.ini file located in your acmepos folder. Then you need to re-brand your computer.
If you want to auto start Ticket Entry you could also put a shortcut for Acme Point of Sale into your Windows Startup Folder then each time you turn on your computer Acme will be launched right into the ticket entry screen, stopping only for passwords if desired.
To streamline the process further you could use no passwords in Acme or use pass-through authentication from your operating system. This means that Acme can use the same username and password as you use to log onto Windows and you only have to enter them once.
See Windows documentation for help in adding the Acme POS shortcut to your startup folder.
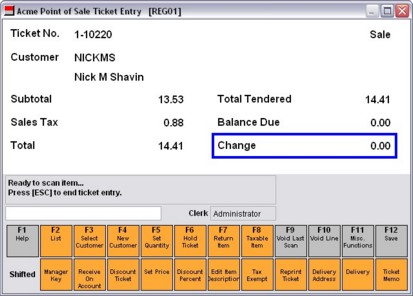
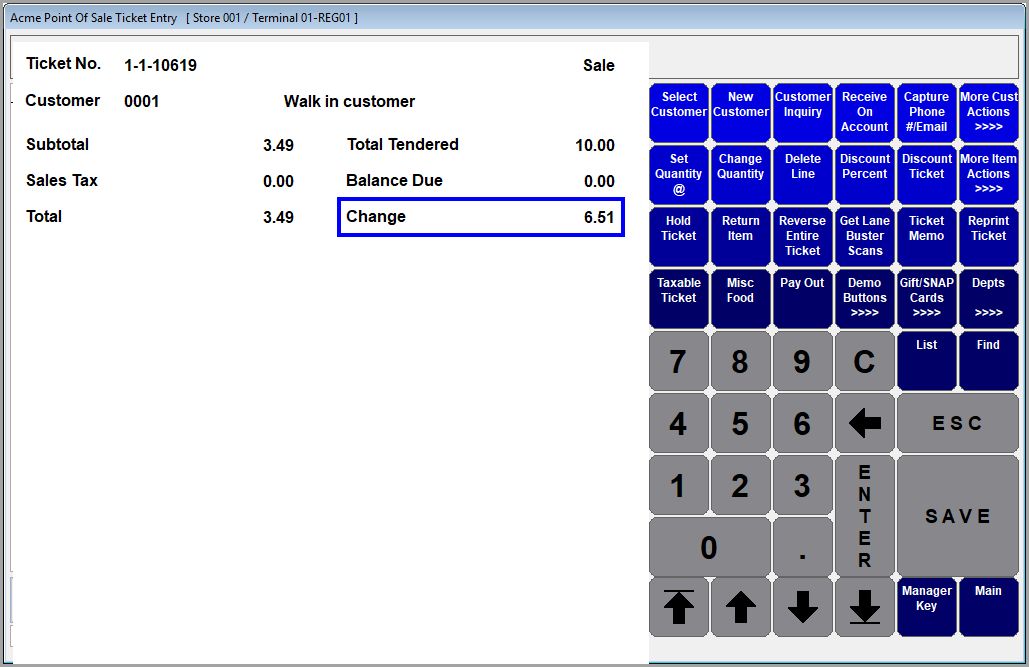
Automatic Ticket Summary Display Y/N
Display a recap of the last transaction including Change to be given back (if any) on the Ticket Entry screen:
On tradition screen layout:
On touch screen layout:
Ticket Summary Display Duration
Choose a duration from the list. Range is from 10 seconds to when next ticket starts (indefinite).
The summary can also just be displayed as needed via function key or F11 menu during Ticket Entry.
Idle Timeout Factor
Choose how long Ticket Entry can be idle between customers before the clerk is logged out and a username and password are required to continue. Choosing None deactivates this feature.
Zero seconds will require that someone log onto the Acme at the start of every sale.
Active Ticket Timeout Factor
Choose how long an active ticket can be idle during Ticket Entry before the clerk is logged out and a username and password are required to continue. Clock starts as soon as the clerk starts scanning items, clock is reset when receipt prints. Choosing None deactivates this feature.
Ticket Entry Help Off Y/N
Disables F1 Help button during Ticket Entry, help can still be accessed via the Help menu unless you Disable System Menu on the POS Terminal Setup >Screen Type Tab.
Screen Background Color
Choose a color for the background (wallpaper) inside Acme. This is helpful when more than one Acme is run on a single computer.
Show "Apply Open Credit" Prompt Y/N
If customer has credit balance, clerk will be made aware of it and able to apply it when switching from Detail to Tender Entry screen.
Ticket Entry Alert Sounds
Select sound Acme plays when it needs to alert the clerk. Sounds require external speaker(s).
Currently use of the alrt sound is limited to certain egregious clerk mistakes, for example trying to change item quantity on a ticket with no items.
Brand This Computer Button
Branding is how Acme identifies each cash register. See Brand This Computer