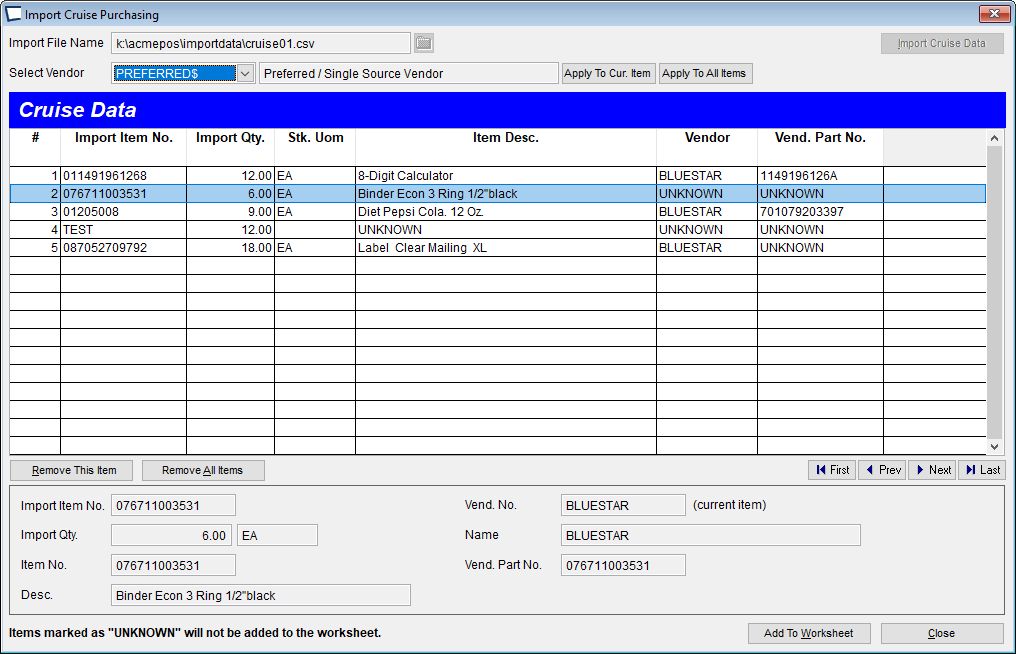
Click >Purchasing >Purchasing Worksheet >Import Cruise Purchasing
For an interactive tutorial see: Enter and Receive Cruise Purchae Order
If Purchasing menu is not active check the setting on >Maintenance >Acme Setup Information >Store Information tab
Our Data Collection Terminals, the Acme Mobile App and other wireless bar code scanners can create files to be used with Acme cruise purchasing. If you need a device check with Total BusinessWare, we'll help you make the best choice for the way YOU do business.
|
You can also create a file using Excel, Notepad or data exported from Acme Mobile App or Acme Data Miner and then Import Purchasing Worksheet

Portable Data Collectors - use a utility program to move properly formatted data from the device to the computer. Inquire for details.
Import File Name -Use the browse button to select a properly formatted file to import. See "Properly Formatted Files" below.
Import Cruise Data -Imports the file. The button becomes active after a file name is supplied. It is inactive after import, when data is displayed in the grid.
See acceptable file formats below.
You can use the HT630 hand held data collector to run the Acme "Lane Buster" program to gather the order data. then use "Get Lane Buster Data from HT630" program to transfer the data to the computer for "Cruise Purchasing". Using this method you can enter item and quantity (optional) on the hand held.
You can add Cruise Data to a worksheet more than once. Existing items will be updated, quantities are not cumulative, they are replaced.
Select Vendor -choose "Preferred" or any other Vendor set up in Acme.
If you choose Preferred the item's Preferred Vendor (as marked on item maintenance Purchasing tab or the item's only Vendor will be used. If the item is available from only one Vendor, that Vendor will be used regardless of whether or not they are marked as Preferred.
If the item has more than one Vendor and there is not one designated as Preferred, that item will use Vendor UNKNOWN. You can change UNKNOWN vendor items to some other vendor, prior to adding the items to the worksheet, but the item / vendor association must already be set up. If this is an issue you may want to consider Import Purchasing Worksheet instead.
If you select a specific vendor from the drop-down, that vendor will automatically be associated with the items when you add the items to the Worksheet.
Apply to current Item / Apply to All Items -these buttons only appear after data is imported. They allow you to change the Vendor for one or all items. You can use this to correct items that have UNKNOWN Vendor, provided they have Vendors set up.
If you apply a Vendor to an item that is not set up for that Vendor the item will be assigned to Vendor UNKNOWN.
Dealing with UNKNOWNS
UNKNOWN Item -see TEST item in row 4 of above image. The item "TEST' was not found in the Acme inventory list. This item will not be added to the Purchasing Worksheet. You do not need to remove the item from the Cruise Data list, but can if you want to.
UNKNOWN Vendor -If the item has more than one Vendor and there is not one designated as Preferred and you did not specify a vendor during import, that item will use Vendor UNKNOWN. This item will not be added to the PO Worksheet unless you apply a Vendor to it. See "Apply to Current Item / Apply to All Items" above.
UNKNOWN Vendor Part Number -these are somewhat self healing, Acme will assign the Item Number to the Vendor Part Number, both in the worksheet and in item maintenance, for future use.
Remove This Item / Remove All Items -remove one or more items from the list.
Add To Worksheet -all known items that have known Vendors will be added to the worksheet. Items already on the worksheet (if any) are updated. Quantities are not cumulative, they are replaced.
This also removes all items from the Cruise Data list.
Close Button -saves the list of items (if any) and closes the Import Cruise Purchasing screen.
Properly Formatted Files
Files can include one or two columns. First column is item number; second is quantity (optional). Any following columns are ignored.
PLU's are not considered, the file must include Item Number. -If you are using the Acme mobile app you can enter PLU or Item Number because the Mobile App sends the Item Number.
If the Quantity column is included, it is always assumed to be for in STOCKING UOM. You can change this once the data is on the worksheet.
If the Quantity column is omitted, all quantities will initially be 0. You can re-calculate them and also edit them on the worksheet.
Row one will be recognized as column headings if the first column is named "itemno", "item", "partno" or "part"; anything else will be assumed data.
Data can be contained in quotation marks.
Here are some acceptable sample file formats:
Sample 1. Column headings and no quotation marks. Item only:
itemno
11491961268
76711003531
1205008
TEST
Sample 2. Column headings and no quotation marks. Item and quantity:
itemno,qty
11491961268,12
76711003531,6
1205008,3
TEST,4
Sample 3. No column headings. Quotation marks. Item only:
"11491961268"
"76711003531"
"1205008"
"TEST"
Sample 4. No column headings. Quotation marks. Item and quantity:
"11491961268","12"
"76711003531","6"
"1205008","3"
"TEST","4"
See Purchasing Worksheet "Key differences in Importing" to compare import Purchasing Spreadsheet to Import Cruise
