Click >Maintenance >POS Terminal Setup >Receipt Printer> Printer Tab
For Windows Invoice Printer (8.5 x 11 sheet paper)
-If you have a receipt (rolled paper) or Dot Matrix invoice printer see below.
If you have not already done so, please install your printer and print a Windows Test Page.
Click >Edit >Port Settings [...] then >Port.
Select Invoice Printer. Click >OK.
A [Select Printer] button appears, use it to select your Widows printer. Note that the printer must have already been set up in Windows to be visible in the pick list. Do not choose Invoice Printer if you are using a dot matrix printer. See next section.
See Receipt / Invoice Tab for additional configuration options and test printing.
For Receipt Printer or Dot Matrix Invoice Printer
If your receipt printer is on a USB port see Receipt Printing to USB or Network
If your receipt printer is on a serial (COM) port or parallel (LPT) port then Acme should talk to it directly.
If you have Windows Printer Driver installed for the device either uninstall it or change it to use a port other than the one the device is actually attached to, since Acme will be talking to that port. Once that is done proceed with the following...
If you haven;t already, in Acme click >Maintenance >POS Terminal Setup >Receipt Printer> Printer Tab
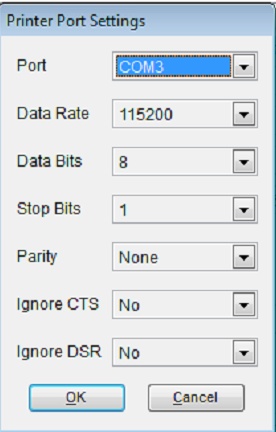
Then click >Edit >Port Settings [...] then >Port. Select the port your printer is attached to, LPT (1 thru 3) or COM port (1-12) and click OK.
This screen also allows for printer specific setup of baud rate, data bits, stop bits and parity if your serial printer requires.
Sample control codes (shown below) are for printers that are configured for Epson emulation unless otherwise noted.
Printer Port Settings
Most printers can use the settings illustrated above.
Initialization Code
Sent to printer before printing.
sample1: <ESC>@<ESC>!<0>
about 42 characters wide on 3.125 inch paper. Also set "Print Character Width" described below to 42. Try these settings if you want the characters bigger.
Sample2: <ESC>@<ESC>!<1>
compresses the font to 56 characters wide on 3.125 inch paper. Also set "Print Character Width" described below to 56. This is the default setting.
Termination Code
Sent to printer after printing.
sample <ESC>!<0>
Cut Paper Code
Tells the receipt printer to cut the paper after printing. Not all printers are capable. (not sent to dot matrix invoice printers)
Epson sample <ESC>i
Star sample <0x1b><0x64><0x01>
Bar Code Command Code
Tells the printer what type bar codes to print on receipts if Print Ticket No. Bar Code is set to Yes on the [Receipt/ Invoice] Tab. This code is not sent to dot matrix invoice printers.
sample <GS>h<50><GS>w<2><ESC>a<1><GS>k<69><nnn><xxx><ESC>a<0>
(prints a code 39 bar code)
Change <GS>h<50> to <GS>h<75> to increase the height of the printed code if your scanners cannot consistently read the code.
Acme by default is configured to print code 39 bar code to printers emulating Epson, using this Bar Code Command Code string:
<GS>h<50><GS>w<2><ESC>a<1><GS>k<69><nnn><xxx><ESC>a<0>
In most cases we recommend code 39. If that doesn't work you may want to try to print code 93 (not 39) using this:
<GS>h<50><GS>w<2><ESC>a<1><GS>k<72><nnn><xxx><ESC>a<0>
Before changing the commands you should confirm your printer is capable of printing bar codes and check which emulation the printer is set for (Epson, Star etc.).
If your scanner can read the code, but not easily or consistently try increasing its height. You may also need to adjust the width of the bar code elements, but we suggest this as a last resort.
Print Bar Code on Star printers, should be same as ESC/POS. If it does not work consider changing the printer from Star emulation to ESC/POS Emulation.
The print bar code command "<GS>h<50><GS>w<2><ESC>a<1><GS>k<69><nnn><xxx><ESC>a<0>" breaks down as follows:
•<GS>h<50> sets the height to print the bar code; or 50 dots (pg. 149 in doc.)
•<GS>w<2> determines the width of the bars; this will vary printer by printer but according to Star documentation the thin element is 0.282mm and the thick element is 0.706mm (pg. 160 in doc.)
•<ESC>a<1> sets the printer to center justification; this centers the bar code
•<GS>k<69><nnn><xxx> is the actual bar code command (pg. 150 in doc.)
•<69> selects the symbology as well as the overall format of the command. The symbology selected is code 39 and format 2 of the command
•<nnn> is the length of the string to be encoded into the bar code. For example, ticket number "1-1001" is 6 characters long and is encoded as <6>
•<xxx> is the actual string to be encoded in the bar code, in the above example "1-1001"
•<ESC>a<0> sets the printer to left justification
The justification commands affects text that follows the command. It is possible to left, center and right justify individual text strings all on the same line.
Print Character Width (works with Initialization Code above)
Dictates number of characters that can be on a single line. Also referred to as column width. Not the same as setting up compressed fonts in the Initialization Code. Width capabilities are printer dependent and can range from 30 to 80 characters. Often this is set to 56, the most common size. This code is not sent to dot matrix invoice printers. You can determine the width capability of your printer using the Quick Test button.
Trailing Line Feeds
Used with Line (receipt) printers. Enter the number of lines to eject from the printer after the receipt is printed and before the receipt is cut (torn) from the roll. This way the printing at the bottom of the receipt does not get cut off. Generally the number to enter is between 2 and 7. Smaller number saves more paper, 2 works with most.
(not sent to dot matrix invoice printers)
Printer Wake Up Codes
Use to wake up battery operated printers. Sent to the printer once per transaction at start of first receipt. Works in conjunction with Printer Wake Up Pause.
<10:NUL> would send ten NULL characters.
Printer Wake Up Pause
Delays sending actual receipt data out to the printer by milliseconds. Useful for battery operated printers that need to wake up prior to receiving data. Works in conjunction with Printer Wake Up Codes.
Common range is 50 to 1000 milliseconds.
Print Graphic Code
Enter code to print a graphic you have stored to printer's NV memory. See printer documentation for intructions to store the graphic.
The following code works on many Epson and SNBC printers running Epson emulation.
<ESC>a<1><FS>p<1><0><ESC>a<0>
Testing Printers
Send Printer Commands [Button]
I/O command utility used to test specific printer commands.
Test Print Barcode [Button]
Tests printer’s ability to print bar codes onto receipts. Acme can be configured to print bar coded receipt ticket numbers. Bar coding the numbers enable the clerk to scan them in during returns and Hold Tickets.
Quick Test [Button]
Tests printing to paper. This prints a diagnostic test pattern on the paper that can be used to check printer width capabilities and basic communication. The output is directed to the printer regardless of the Print to Display setting on the [Receipt / Invoices] TAB. -Note the number of characters printed per row can often be dictated by the initialization code described above.